How to set up SOCKS5 proxy server (Dante) on a VPS
Many of our customers use their VPS as a proxy server, and we noticed most guides out there are outdated. While it’s fairly straightforward to do, it may be difficult figuring out where to get started or how to fine-tune specific settings to fit your needs so today we’ll go over it all.
What is a SOCKS5 proxy?
We won’t get into the technical details in this guide. Effectively, though, you can think of a SOCKS5 proxy as a way you can have a specific program on your computer tunnel its traffic through another server. So it’d be similar to a VPN, but more specific, or an HTTP proxy but not just for your browser.
You can benefit from this by being able to, for example, run only your qBittorent application through the SOCKS5 proxy while keeping the rest of your computer’s applications running without one.
You can also use multiple SOCKS5 proxies for different applications. This means you could have each one going to a different region or having different public IPv4 address, to name a few use cases.
Quickly run a SOCKS5 proxy on a VPS on Debian 11 or Ubuntu 22
For this guide, we’ll be using Debian 11 but all commands will work the same on Ubuntu 22 as well as most versions of Ubuntu or Debian. We recommend sticking to these operating systems as they have the required package on aptitude, which means we do not have to compile it.
Connect via SSH
Not sure how? View our other tutorial here.
Install “Dante”
We’ll be using Dante, which is a socks server, but first, run an apt update.
apt updateThen install Dante:
apt-get install -y dante-serverInitial Dante SOCKS5 Proxy Server Configuration:
Let’s get you going quickly on a simple configuration that works out the box. Keep in mind we’re using Debian 11 with root user and an interface called eth0. We’ll tell you how to set it up with one IPv4 address and password authentication, but later down the guide we’ll show you how to troubleshoot/modify the configuration if you have a different interface or want to set up more IP addresses and/or different authentication types.
Basic Configuration
First let’s keep a copy of the original configuration, just in case.
mv /etc/danted.conf /etc/danted.conf.bakThen use your favorite text editor to create a new configuration file. We’ll be using nano
nano /etc/danted.confAnd copy this configuration, ctrl+x and y and enter to save.
logoutput: syslog

internal: eth0 port = 1080
external: eth0
external.rotation: same-same

socksmethod: username
user.privileged: root
user.notprivileged: nobody
client pass {
	from: 0.0.0.0/0 to: 0.0.0.0/0
	log: connect disconnect error
}

socks pass {
	from: 0.0.0.0/0 to: 0.0.0.0/0
	protocol: tcp udp
}
Then restart the Dante proxy server for the configuration to take effect:
service danted restart
That’s it, you’re done, but if it didn’t work it means we may have to alter the configuration or allow it through firewall, which we’ll go over next.
Using the SOCKS5 Proxy
So right now we have the server set up with username & password authentication. Of course later on you should change this to a better configuration, such as not using the root user.
- For your IP address, put the same IP address that you used to connect to the server via SSH.
- For the username use root
- For the port, use 1080
- For the password use your root password.
Modifying Configuration & Troubleshooting
Let’s explain what this configuration means very quickly for the most important portions:
- The internal: eth0 is where traffic enters and external: eth0 is where it leaves
- The external.rotation: same-same means it uses the same entry and exit points, which means if you connect to one public IPv4 address (if you have multiple) it will leave that same IPv4 address (appear as that IPv4 address to servers you communicate with such as the application you use the proxy on.)
- The socksmethod: username means you’ll authenticate with a user on your VPS.
- The user.privileged: root means that the user called “root” is allowed.
- For the pass portions, the 0.0.0.0/0 to: 0.0.0.0/0 portion means we’re allowing anyone to connect to the proxy server, which means anyone who provides the correct username and password from anywhere in the world (we can lock this down further later.)
Allowing Firewall
For our setup, we did not use a firewall, but you may have a firewall set up and need to allow connections to port 1080 for it to work. We won’t be covering firewall setup on this guide, but you can use any guide for the firewall you’re using on the internet and just set it up to allow connection to port 1080.
However, assuming you are using ufw here’s a quick way to allow that:
sudo ufw allow 1080Modifying interface
If your interface is not called eth0 you will need to modify the configuration file. Type the following command to grab your interface name:
ip addrLook at the output, and find the portion that looks like your public IP address, and refer to the interface name for that section of the output.
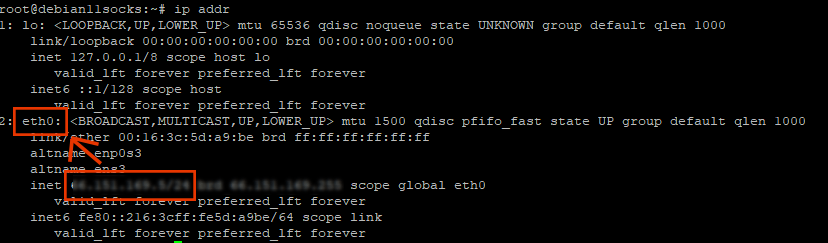
Remember the name of the interface, and then go back to the configuration file and change eth0 to the interface name you found.
Editing Configuration File
Any time we reference changing the configuration file in this guide, such as above, just follow the instructions below.
nano /etc/danted.confSave, and restart.
service danted restartYou can also use the following to restart:
systemctl restart danted.serviceAdding IP Authentication
Go back to the configuration file, we’ll be editing this portion:
client pass {
	from: 0.0.0.0/0 to: 0.0.0.0/0
	log: connect disconnect error
}
Change the from: 0.0.0.0/0 portion to your IP address, so for example, if your IP address is xx.xx.xx.xx then it would be from: xx.xx.xx.xx/0 and then save the configuration and restart the proxy server.
If you want to allow a second IP address to be able to connect, simply copy over the entire code section above and paste it for a second time and change it to the second IP address, and so on.
Other configurations
To use a different username, just change this portion and change root to any username you want to use.
user.privileged: rootTo use additional IP addresses, just add the other interfaces underneath the following, using the same format. You can use as many as you want, just change the interface name.
internal: eth0 port = 1080
external: eth0
Checking for errors
It’s possible you may have made a typo somewhere (most commonly) in the configuration. To see why it’s not running properly, just check the output for why it’s not running:
service danted status
That’s all!
